Applications
 Part of the Oxford Instruments Group
Expand
Collapse
Part of the Oxford Instruments Group
Tutorials
Published: 01 Mar 2011 · Last updated: 20 Oct 2023
The settings applied during the image acquisitions are crucial to obtain desired image information. Yet, the image characteristics may be less than optimal and the preferred results are not achieved, because of compromises you may have had to make during the image acquisition.
Before you proceed with image analysis, Imaris Display Adjustment functions offer several ways of adjusting the image display. The Display Adjustment function lets you interact with each channel individually, control the channel visibility and color, adjust min and max Intensity Range, and change the Blend Opacity. In addition to this, it lets you fine-tune the Gamma Correction and gives details about the channel histogram.
All changes made in the Display adjustment window affect only values displayed on screen, while the image/channel voxel information remained unchanged.
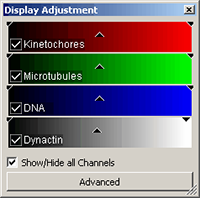
In the upper part of the Display Adjustment window, each channel is represented by a channel bar. The channel visibility is controlled by a check mark next to the channel name.
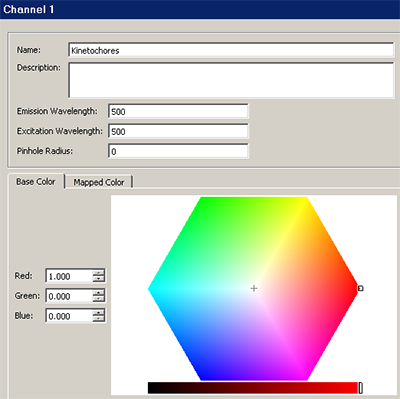
Click on the channel name opens the Image Properties window. There you change the name of the channel from the default title, enter further description or add info to existing parameters. This window also contains a selection of color tables that can be applied to the selected channel. Depending on the color model you select, the selected channel is mapped with the RGB additive color model or more user intuitive HSV model.
The Display Adjustment lets you choose either to process each channel separately or to apply the same settings to all channels. A single channel can be selected by clicking on the respective colored bar. If you check the Select all Channels box, the changes will be applied to all channels.
Click on the Advanced button provides additional display adjusting features.
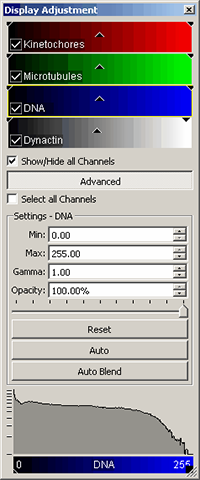

For each selected channel(s), you can adjust displayed Minimum and Maximum intensity values. These properties can be adjusted by entering values in the Min/Max numerical fields. Alternatively, if you don’t know numerical values, Min/Max intensity values can be adjusted by moving the handles within the colored channel bars. The position of two handles controls the limits of the displayed intensity range.
To adjust the Minimum, click on the left handle and drag it. The same principle applies for changing the upper intensity limit. Click on the right-hand side handle and drag it to the desired position. The changes are instantly visible in the viewing area.
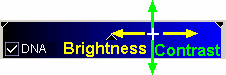
Click on the color bar lets you interactively adjust the brightness and contrast of the selected channel. Altering the channel brightness changes the displayed intensity values, equally adding or subtracting an offset value. As a result the overall shown average intensity is altered. Adjusting the channel contrast appears to increase the intensity above average and reduce the intensity below the average, while the average intensity will remain the same.
To adjust the brightness of the channel, click on the color bar and drag the cursor left or right, until you get the better brightness setting. To extend the contrast range, click on the color bar and drag the cursor up or down until you have found the desired contrast setting.
Gamma defines the linearity of the relationship between the actual image intensity values and the brightness of the displayed image. The default value of the gamma correction is 1, indicating the perfectly linear relationship. In Imaris gamma values can range from 0.1 to 5.0. If you enter the value below 1, the channel(s) lower intensities will appear brighter and the linear trend is transferred to a nonlinear. On the other hand increasing the gamma will result in a brighter image; the intensity values in the middle will appear increased relative to the intensity values at the ends of the range.
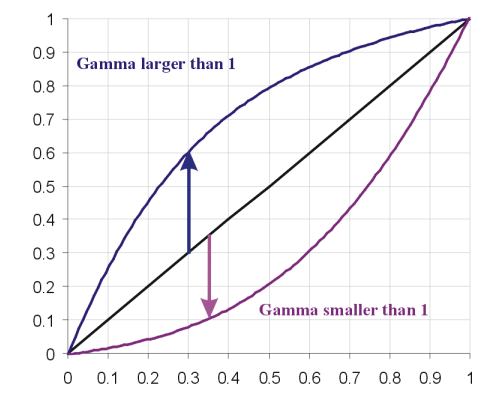

Instead of entering the numerical value, you can select the gamma-correction tool by clicking to the middle triangle in the channel bar. Drag it to the left to increase gamma value or to the right to decrease it.
The blend opacity adjustment allows you to change the opacity in real-time in blend projections in Section, Full 3D, and Surpass Volume views. To adjust the blend opacity, either set the numerical value in the filed or drag the slider bar. If you drag it to the left the blend opacity is reduced or move it to the right increase blend opacity.
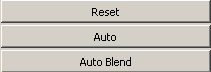
There are three important buttons in the Display adjustment window; Reset, Auto and Auto Blend.
Click on the Reset button to set the image back to the original display. When clicking the button Auto, Imaris automatically detects the actual high and low values and sets the Max. and Min automatically to these values. The Auto Blend button is practical if you display your data in the Blend mode. Click on this button and Imaris automatically calculates the optimized Min. and Max range.
At the bottom of the Display Adjustment window is a histogram of the selected channel. The two numbers under the plot are the minimum and maximum displayed pixel values. On the left you find the min value and on the right the max. The histogram line shows the intensity distribution of the selected channel.
If you have questions about this or any features found within Imaris, please contact your local Sales or Support team.

© Oxford Instruments 2026